Showing posts with label thrifty living. Show all posts

Saturday, April 13, 2013

Linoleum Floor Cloth - my weekend project!

As we keep plugging away at remodeling the house, my mind is already in the "decorating" mode... and it has been for about the last year. Too bad you can't decorate before the dry wall is done or the plumbing is roughed in....  But one thing I have been thinking about is our eating area of our kitchen... where our table will sit. I personally prefer that a table be "grounded" visually with a rug underneath it. I think that the rug defines the area, beckons a person to it, and protects the floor from the chairs scooting in and out. The problem with a traditional area rug under a table is spills! (With a lot of littles around this house, our floor takes a beating daily)!  So the solution to my dilemma seemed to come with the idea of a floor cloth. It gives the best of both worlds: visually grounds the table, protects the floor, and is easy to clean!

I had several options, the first being to make one or buy one. Um, that was easy, I'm way too cheap frugal to purchase a ready made cloth. My next option was whether to make it out of canvas or linoleum. I really pondered this one awhile. But in the end, it seemed that linoleum would be easier/stiffer to work with than canvas. So that is the route I went. Then came the dilemma of designing it. I knew the color scheme I wanted to use, but I had no idea what design I wanted to paint. I searched the web and looked at dozens of floor cloths to get inspiration for my project. After getting a general picture in my mind, I got out my graph paper and drew it to scale experimenting with my color scheme. After I had an acceptable design, I was ready to get started.

I purchased a 6 x 9 remnant of linoleum at Lowes for just under $30. It had a 6x6 inch tile design on the front side of it which I wasn't crazy about showing through my rug, so I chose to paint the back of it instead. That being said, as I laid out my design, I could ever-so-slightly see the grid which really helped a lot when taping off.  I also will say that I MEASURED NOTHING on this rug (because I couldn't find any ruler, yardstick, or tapemeasure even after hunting high and low!). It was all "eye-balled". I didn't want it to be too perfect because I knew that I would have paint bleeding under the places I had taped off anyway (maybe other people have good luck with crisp, clean taped off lines.... I don't...). So if I started out with the mindset that "this will not be a perfect design", it would keep me from being too upset when it didn't turn out exactly as I had planned.

So here is what I did to create my floor cloth: First, I unrolled it and let it flatten out for awhile. After that I used a primer and gave it one coat. All of the paints I used were left over from our house remodeling project, and they were all latex based. I had planned on giving it 2 coats of primer, but I didn't have enough left for 2 coats... so 1 coat had to do.
After the primer dried, I painted the base coat. I chose the color of my kitchen walls for the background. I let it dry and then painted a second coat. This was the easy part because there was no taping off involved!
While I was letting that dry, I took a break and took a picture of a "too cute" 8 month old....


Now came the harder part... taping off and laying out the design. I decided to paint a boarder around 6 squares. I wanted each of the kids to have a square palette to paint their own picture in. I rummaged through our porch looking for something squarish to use as a template for taping off so that they would be somewhat even since I didn't have a measuring devise (note that I FOUND a tape measure AFTER I was done with the rug.....). In the corner I found some paper targets... 1 foot square each! And they were adhesive! So I was able to stick them right on the rug with out taping. After I positioned and stuck them on, I taped off a 1 inch-ish border around each one and sponge painted it sage green. At the same time, I taped off a border around the edge of the rug. I wanted one wide stripe and one narrow stripe, with a stripe of the background color in between them.


Note the "blue" electrical" tape... wouldn't you know that I ran out of painters tape when I had only 5 feet of area left to tape! (I found the frog tape that I KNEW I had... after the rug was done... and it was in the box of supplies that I looked through THREE times when I was frantically searching for it)!  But, FYI, electrical tape (with a couple of pieces of duct tape to hold the ends in place actually worked fairly well)!

After the taping off was complete, I rolled my red border around the rug. I did 3 coats of red, letting it dry between coats.

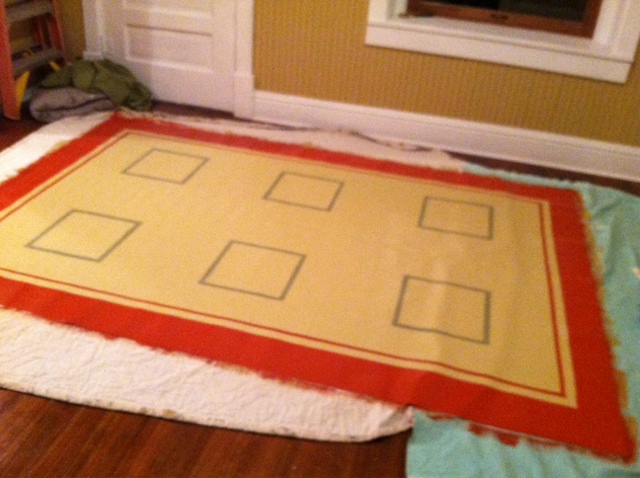


After removing the "targets" and the tape, here is what the rug looked like. I thought that the squares needed to "pop" a bit in their background color before the kids did their thing. So I painted each square with 2 coats of a bit darker tan.
Now it was ready for the kids to do their thing. This is the part that took much effort on my part... let-the-kids-paint-what-they-want-in-the-style-they-want-knowing-that-it-would-not-look-perfect... Why is that so hard???????  OK, I compromised... I helped Kyli (2) and Kaser (8 months) on their squares. But the others did their own thing... with the exception of Kenan (4) who painted his square with Daddy.


OK, this picture is upside down... but Kenan and Kyli did footprint butterflies and Kenan also did handprint tulips. That was interesting because he didn't want to make a hand print. He wanted to make a fist!

After the kids finished their masterpieces, I wanted to write Psalm 128 down the middle of the rug. Here is a tip: If you want to freehand anything on a rug, wall, etc... use CHALK before painting the design. It works better than pencil and it wipes off easily (unlike a pencil which needs erased). So I took chalk and wrote out the Psalm making sure that it fit somewhat evenly. Once I had it done in chalk, I decided that I liked the "light" color for the words rather than a "dark" color that I had envisioned. So I got a cream color and painted right over my chalk marks.  So there you have it: My weekend project. All that needs done now is 3 coats of a water based polyurethane which I did not have last weekend. So sometime in the next couple of days I will be finishing it up. What a fun, easy project!!!!!  Once it is completely done, I will update the post with a picture of it without the drop clothes!!!


Friday, February 22, 2013

The Gold Mine in Your Own Backyard!

I really thought that I would have a lot more time to blog when I decided to create one... however, it seems like maybe once a month I actually get the chance to sit down and type. But, several times a week I find myself blogging in my head.... those blogs just never seem to make it to my fingers! However, I have been meaning to share about this topic for a couple of months now... Your local thrift store!

Yes.... this is probably OLD news to most people. And NO, I am not a "name brand" snob who only shops at Gap, The Children's Place, Old Navy, Dillards, etc...(In fact, my favorite things are hand-me-downs!)  But I haven't until recently made it a habit to make it to our local thrift store. In fact, I have lived here for nearly 13 years and my first time frequenting it was 2 months ago.  Why? I suppose that it is because I heard some rumors about it 13 years ago and it tainted my expectations of the store and I never revisited the thought of going there.

Well, I could not have been more wrong in not shopping at the thrift store. It is a GOLD MINE! It is very well organized, they are very picky about the clothing items that they choose to sell, the volunteers are great, the prices are great, and they even have great sales!

So what kind of treasures have I found? First and foremost: kids' clothes (especially blue jeans). Just a side note here... I'm not sure how a kid is able to actually outgrow a pair of jeans without getting a hole in the knee... I don't know that I have ever had that happen... and if it ever did, the next kid to inherit the jeans would certainly "do them in"... So blue jeans are a constant need in our family. If I have to pay full price for a new pair of jeans, then the holes in the knees really don't bother me. But if I can get a pair for $1.50 or less, then SOLD!  So, my favorite thing to browse through is kids' clothes....  But that is not all!!!

I recently have been wanting a few long denim skirts (A-line and tiered), but I have been too cheap to buy any online at $25-60 each. My first trip to the thrift shop yielded me FOUR long, denim skirts all in my size... 3 were A-line and one was tiered!!!! And the price? Less than $8 for all four of them (Gap, Maurices, and Lands End were the brands).  Then, we were in the need of 2 pairs of snow pants for our growing kids.... I actually could have gotten by with one, but my 4 year old son really didn't want to wear the pink pair that was passed down to him from big sister... So, back to the thrift store I went and I found just what I needed. And even better, it was "bag" day where a bag full of clothes costs only $3. I have also gotten 2 down vests (Lands End and Cabelas), a pair of insulated work bibs for my 10 year old, a pair of Keen mary jane shoes, a bread machine for my mom ($2.50), a RED crock pot that is perfect for overnight oatmeal (my recipe eliminates the last 4 ingredients of hers... we sweeten the next morning with raw honey), a like-new pair of camo waterproof, insulated, hunting boots, gallon and 1/2 gallon jars, drinking glasses, etc... In fact, my husband has never been there and it is his new favorite store!

OK, I'll stop going on and on about my finds right now.... but in case I'm not the ONLY one who is fairly new to the thrift store shopping experience, I wanted to give a few hints on what you might need that your thrift store "probably" has... Coffee pot carafes... Haven't you ever broken one? and when you went to Walmart to replace it, the carafe was more expensive than a whole new coffee maker??? Try looking at a thrift store instead! Our local store has a whole basket full of various carafes just waiting for a new home. What about soccer shoes for your kids? Instead of buying a brand new pair for the 6 week season, you might find a whole selection of shoes that were only used for 6 weeks the year before! And what about kids' dress shoes? I can't tell you how many times I have bought new black dress shoes for my oldest's piano concert and they were only worn one time (because ALL of his other dress clothes are earth tones which doesn't necessitate a pair of black shoes). Well, judging by the selection of black dress shoes, I'm guessing other moms have done the exact same thing! Other barely worn things that tend to abundantly find their way to the thrift shop are: snow clothes, holiday items, vases, glass ware, glass tea trays, dress clothes, small appliances, special occasion shoes (snow boots, dress shoes, soccer shoes, etc), purses, wallets, duffel bags, yarn, sheets, material, etc...

I don't want to down play Goodwill stores because some of them are very nice and I have found a lot of good things there too. Our local Goodwill is also great, but honestly, their prices are higher than our local thrift store, and they aren't as picky as to what they sell. That means that I have to "dig" harder to find clothes in good condition than I do at the thrift store. But if Goodwill is all you have, by all means go treasure hunting there... but don't discount your local thrift shop just because they don't have the advertising dollars.

Well, there you have it, my two cents worth on thrift store shopping! What is your favorite thrift store find????